Introduction


My name is Phoebe Hung and my candidate number is 8017. I completed brief 1: music industry. I worked with Georgina Harper-Dennett (8720) and Gabriel Meytanis (8560). To see my work, please click on the 3 labels on the right named A2 Research and Planning, A2 Construction, and A2 Evaluation.

This is our music video

This is our music video. Please view it in 1080p for optimal experience.

My Music Video

Front digipak text

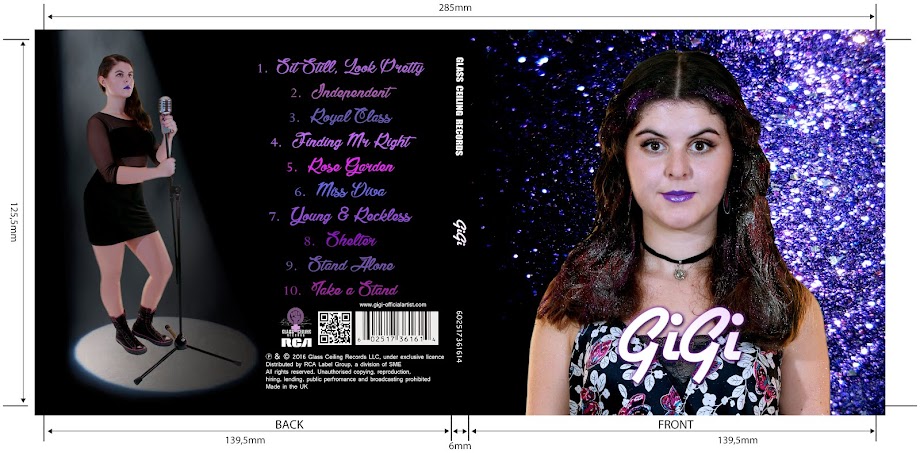
These are the front panels of our digipak album cover:

Digipak front cover image

Digipak front cover image

Inside digipak text

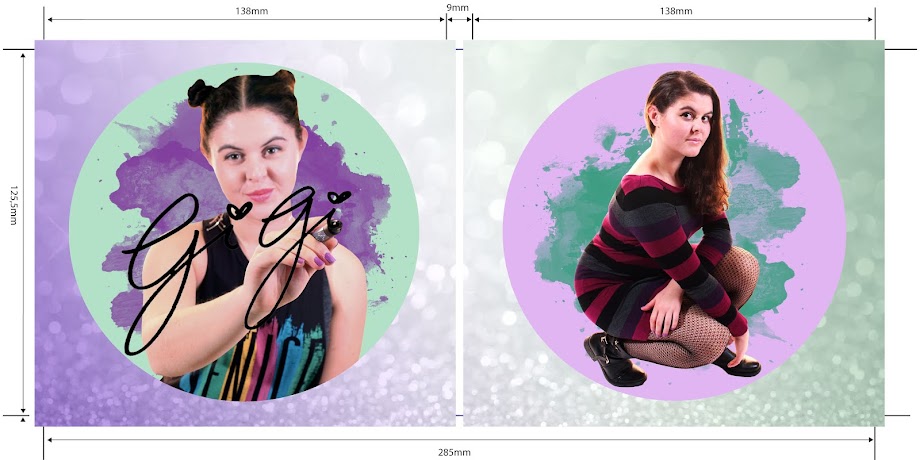
These are the inside panels of our album digipak:

Digipak inside cover image

Digipak inside cover image
Our website:

Please click on the image below to enter the site


Showing posts with label A2 Research and Planning. Show all posts

Friday, 23 September 2016

R&P Post 33: Reflections on my role and contribution during Research and Planning

During the long process of Research and Planning, our group have seen our ideas come to life. It hasn't been long since we were brainstorming concepts and soon we will start putting them all in place. As a team, we have worked together to make executive decisions. We have also been working individually to research our ideas and collect references; strengthening our understanding of underlying concepts.

We delegated roles according to our strengths: Georgina was fast at producing elements such as the shootboard, Gabriel was best at the technological parts and would often go over the viability of our ideas. I mostly excelled at collecting reference points and producing documents that we could refer to. My creativity enabled me to draw a lot of the flat plans that would form the baselines for our construction.

We worked really well as a team

Below, I have detailed my role and contribution during Research and Planning, both as a group and individually:

As a group

Came up with creative ideas

Brainstorming ideas
We all came up with ideas for the music video during our group meetings. I think that I am very creative and so I loved to share my rough designs with the group. We brainstormed some initial ideas before branching out into researching individual sections.


Edited our Steal-o-matic

Music video references
that I found
I was able to contribute a lot to our Steal-o-matic. This was because I had watched a lot of music videos in preparation for the project and was able to come up with a wide variety of references for the video. In particular, I was able to pull up music videos from Foxes and Melanie Martinez which gave us ideas on the notion of looking when Foxes opens her eyes and the idea of being sucked inside the doll's house.


Prop and set design

Transforming our backdrops
Wallpapering
with Gabriel


I worked with the group to wallpaper the boards that would form the background for our dollhouse setup. I was firm on buying real wallpaper instead of printing out and sticking dozens of pink flowers, as was suggested by Georgina, because I thought that it would add to the realism of the video.

I hope that, from the photos, you can see how essential the wallpaper was to the narrative of the music video.

Creating our posters
Posters that we printed onto A2 sheets
Circled in red are the dwarfs that I produced
We printed out A3 sheets of the dwarfs, the WW2 poster and the Housewife poster. We then stuck them onto large cardboard placards and cut out the dwarf outlines. We also created bases so that they were level and stood up unaided.

Filming our test shoot

During our test shoot week, I filmed Georgina as she performed in the Land Girls and Snow White setups. I was also in charge of directing the performance - shouting out cues for Georgina to do a particular movement, or reminding her of the lyrics she had to sing along to.

Acting in the test shoot

In addition to filming our test shoot, I also acted in it as the female doll. This was a great experience for me because I was able to the theories that I have learnt about; regarding direct address and performing to the camera.


Individually

Produced digipak flatplans

Drawing the flatplan for the digipak
I came up with the fundamental concept of the album cover and I drew the flat plan for our digipak panels. The flatplan is vital to the production of our digipak as it was a visual representation of all my ideas and I found that we referred to it constantly during the production phase.

I also did a lot of research into album covers so that I had all of the references that I needed to produce a digipak that conformed to all of the conventions.

I enjoyed working on the album cover and creating the flat plans because I have been able to fully understand and utilise the link between promotional marketing and the production of the album cover. I have used references to learn about conventions so that I could conform or go against them to gratify audience expectations or pique their interest.


The front cover of our digipak that I drew


Drew potential promo shots

I drew the sketches for our promo shots. These were crucial to our project when we took our promo shots for the website and for the digipak. Because of this, the group entrusted me with taking the lead for the task. I was able to direct Georgina to do the poses and convey the right expressions.

My sketches for the poses
for our promo shots

Produced the call sheet

I produced the call sheet that our group used for our main shoot. This was important to our group during that time because it contained all of the information that we needed for our shoot. This included the different roles that we played in the shoot, the start and end times for each day and health & safety procedures.

The call sheet that I produced

Sourced and made references for makeup

I produced the presentation of makeup references for each setup and I sourced the makeup that we used. I have practiced applying makeup on Georgina so that I can prepare for how to do her makeup for each setup.

Makeup moodboard
Our makeup station


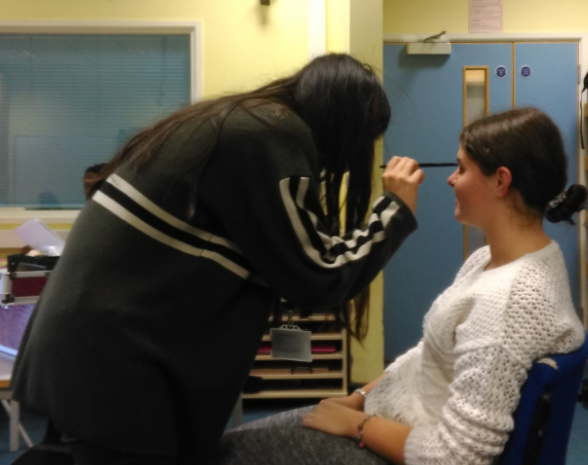
A photo of me applying makeup on Georgina
I think that I have contributed a lot to the research and planning aspect of the project. Together with my group, I have completed a lot of research into various aspects of the marketing campaign. With all the knowledge that we have gained, I am confident that we will produce a stunning campaign. The pre-production element was vital to the construction aspect of our project.

R&P Post 32: Test shoot and rough edit

The test shoot plays a vital role in the pre-production process as it allows us to produce a visual plan for our music video. This is the time when we can identify things that look good as well as things that do not work well and think of ways to improve it. During this time, we will not go into too much detail as we only have a third of the time that we will have in the main shoot.

Below is the schedule for our test shoot. My group (group 2) are coloured in green. A problem that we will have to overcome is that we have a long gap in between our shooting from Monday to Thursday.

Our schedule for our test shoot
Below are photos of us in action:

Chilling on the sofa after a long shoot

We were unlucky to have our main shoot immediately after our test shoot. We had no time to edit our rough cut between the Friday of the test shoot and the Monday of the main shoot. Despite this, I managed to use the time, that we weren't busy shooting, at the edit suite and produced this rough edit in a short amount of time. Due to the time constraints, I was only able to produce the rough cut for the first half of the song.


Another issue is that any feedback that we got on our footage wouldn't benefit the narrative part of the music video because we did not have enough time to complete that section of the video. Therefore, any improvements that could be made on the dolls house setup would not be identified.

I have put all of the feedback that I got from teachers and members of our target audience down below:

Feedback from my teachers

Screenshot from whatsapp
Feedback from our target audience


In response to our feedback, I have made a list of improvements that we will make for our main shoot.

I went to purchase a lipstick
in a bright purple shade

All in all, our test shoot was very important to our project. It would have been even more useful to us if we had enough time to complete the entire rough cut and gotten feedback for the second half. On a positive note, we gained a lot of insight into what our target audience think of it and will use this to improve our music video.

R&P Post 31: My call sheet

Producing a call sheet is important to us because it tells everybody the clear start and finish times of the shoot. 

I made this call sheet that we will use during our main shoot week. It is simple due to the fact that we only have one main actor in our music video and we have kept the actors to within our own team so that there are no complications about having to rely on people who may not be able to do the shoot.

Call sheet
Main shoot schedule

The call sheet will be used in conjunction with our schedule which is colour coded for the different set ups and the crew member who will set up or act for the shoot.

I found both the call sheet and the main shoot schedule very useful during the shoot. The call sheet detailed the group member's individual roles which was convenient. The main shoot schedule was also helpful because was colour coded and had the names of all the people who were meant to be at the Seward Studio during what periods.

R&P Post 30: My shoot-board

The shoot-board is one of the most important documents that we will produce. It is a guideline for the shots that we intend to shoot in chronological order.

During filming, we will use the shoot-board to keep track of what we have yet to shoot. One of our group members will tick off the shots that we have completed so that all of us can follow the schedule in order to complete the shoot on time and move on to the next set up.

It is always useful to have a visual guide when filming. The shoot-board will also be helpful to our teachers or technician if they want to be check our progress.

We have produced a test shoot-board which we will revise to make the main shoot-board.
Test shoot-board

In retrospect, the shoot board could be improved by breaking the timing into sections instead of assigning specific times to each shot. We used a ticklist in conjunction with the shootboard which was very useful to us during the main shoot.

Our ticklist, which we used in conjunction with the shootboard

R&P Post 29: Rehearsals

Rehearsals are vital to ensuring that our real shoot runs smoothly. If something were to happen during a rehearsal, one of our group members could flag it up and make sure that we improve on it for the real shoot.

Before the test shoot, we recorded a video of Georgina practicing her lipsync to the song. Her experience in theatrical drama is evident in the way that she conducts herself, making her the perfect choice for the role.


A photo of me at the lighting desk

We also used the time before the test shoot to experiment with the different lighting using the lighting desk. Gabriel and I got ourselves accustomed to changing the lighting for our setups and saving them under memories so that we could bring up the same lighting on our test shoot. This proved very useful for our main shoot as the two of us would spend a lot of time setting up the lighting and moving them.


In hindsight, I think that we should have rehearsed in the studio. Despite Georgina's solid theatrics and excellent lipsync, the small room that we rehearsed in did not prepare us for performing in the large space of the Seward Studio. If we had done this, we could have planned the shot types and dance moves which would have greatly benefited us during our shoot.

R&P Post 28: My kit list

Photos of our kit
Our Kit List:
  • Canon 5D Mk. II camera
  • 24-105 mm Canon lens
  • Canon 550D camera
  • 18-55 mm Canon lens
  • Tripod: Manfrotto 546B Pro Video Tripod with Mid Level Spreader
  • Dolly (for movement)
  • 650W ARRI turret floor lamps
  • ARRI Studio Lights
  • LeapFrog lighting console
  • Control Tablet
  • Apple iMac
  • Samsung TV Monitors
  • HDMI Cable
  • Cyclorama
  • Clapperboard

A breakdown of camera functions
and how we used them

My group during our technical briefing
Although all of our group members had participated in the music video remake which took place in the Seward Studio, none of us were well versed in the technological aspect of it. We were given a technical briefing by our media technician, Emma, who introduced us to new kit such as the sound and lighting desk. We learnt how to operate the new kit and also updated our knowledge on existing experience with the camera.

We plan to have six different lighting setups which we will control using the lighting desk. We experimented with the lighting and saved the lighting as memories so that we could simply press GO to bring up the lighting that we wanted. We also plan to shoot using camera movements. In order to do this, we will use a dolly to create a smooth track.

The Seward Studio with most of our kit set up in purple lighting
We also signed the studio health and safety training manual, ticking off the relevant boxes to show that we understood all the various pieces of kit and knew how to use them.


I think that my group have gained a lot of insight and learnt a lot more about the technology that we will be using as a result of the technical briefing. By experimenting with the lighting and sound, we have gotten more confident in operating the equipment. I think that we will be able to do well in the shoot, using our newly gained knowledge in how to handle the technical equipment.

R&P Post 27: Casting

We chose to cast members of our group for the music video so that we wouldn't have to rely on other people who may have other commitments. This works in our favour because with our own crew, we can maximise the rehearsals and make sure that 100% effort is given during the shoot. All of us have benefitted from participating in the "Shake It Off" remake and this will positively affect the performance for our shoot.

Georgina plays the role of GiGi and the multiple other roles that appear throughout the video. I will play the female doll who GiGi pulls out of the doll's house. We didn't want the music video to completely alienate the male audiences so we are testing Gabriel's suitability as the male doll in the test shoot.

Below is the cast list with a brief description of the character and their personality.


Our cast have found the cast list useful as it helps us think of how to express our characters. However in hindsight, if I were to redo the cast list I would have included reference points so that we could draw inspiration from existing sources rather than ourselves.

After completing our test shoot, I am certain that we made the right decision in casting Georgina as the main role, Gabriel as the male doll and myself as the female doll. We found that the male doll was vital to the narrative of the music video and that Gabriel was best suited to playing the role.

R&P Post 26: Set design, locations and props

We plan to shoot our music video in the Seward Studio. We have used it before for the recreation of Taylor Swift's music video "Shake It Off" for our prelim task and so we have experience with the technology that we will be using during the shoot.


A picture of the Seward Studio during the
Shake It Off remake
The positives of using the Seward Studio is that it is in our school. This means that we can access it whenever we can during our shoot week and can help set it up for the next shoot. It also means that we can ask teachers or our media technician, Emma, for help if we encounter a technological issue.

However, a problem is that we will have to spend a lot of time setting up and may have little time to shoot.


We drew top down plans of the different set ups that we will have. This enables us to visualise what the studio will look like on the day:
Design of our set ups (please click to enlarge)
We will have a white cyclorama which we will light with different colours to help differentiate the different set ups. We were inspired by the Taylor Swift music video which shows her in the same studio but the use of costume, props and lighting makes the set ups look very different.


Example of Taylor Swift's different set ups
Below is the props list that we made. We can use it as a checklist to make sure that we have everything that is needed. The problem with having so many props is that we may lose track of the props that we need for the shoot. Hopefully, with the use of this props list, we can make sure that we have it all on hand.

Props list

We have a good idea of what we want to use in our music video and the effects that it will have on the set. By using the Seward Studio, which we have used before, I am confident in our abilities to operate the equipment and produce a high quality studio based music video with a variety of props.

R&P Post 25: Costumes, props and make-up

Costume, props and make-up are a key aspect of production but it is particularly important to our music video due to the numerous different set ups needed and the different personalities that our artist will show.

I have created a powerpoint to clearly show the reference points that we will use. This was extremely useful to me as I needed to refer to it constantly when I did Georgina's hair and makeup.


I showed my moodboard of makeup and costume ideas to my friends who fall under my target audience. At first, they said that all the different styles were too overwhelming and that it would be confusing to see it in a music video. However, a few pointed out that the styles from the performance section were nice because they were wearable. They all agreed that the looks and styles were definitely representative of the setup. For example, the trademark 1950s hairdo.

I watched makeup tutorials on Youtube to get an idea of how I would do Georgina's makeup for each setup. This was a good starting point for me because I can get inspiration from the techniques that they used.

Makeup tutorials that I watched on Youtube


I was torn between whether or not to buy a snow white costume so I asked for my team members' opinions as well as our target audience and teachers. The unanimous decision was that it was not necessary if we had signifiers of Snow White - the apple, the seven dwarfs.

Here I am applying makeup on Georgina
to test out the looks

Marionette makeup by a makeup artist
that I follow on Instagram
I was inspired to do body makeup on Georgina using body paint so as to create hinges and sockets on her shoulders and elbows. But we did not have the correct body paint and it would be too time consuming. Even though it had positive feedback from the target audience, I had to adapt and could not complete the marionette makeup.


In order for me to convincingly appear like a doll, I purchased circle lenses online. The ones that I bought were green 14.8mm diameter lenses. To access the item on the website click here. They are quite striking and it created the desired effect.

My reference point for makeup styles will be vital to the characterisation in the music video.

R&P Post 24: Planning my digipak panels

The digipak panels are 4 sides that form the album cover. The album cover is a vital part of marketing as it is one of the first things that the audience see when they choose to buy the album. Below is the template for the digipak panels.


I want to make sure that the images that I use are attention grabbing and interesting enough to intrigue the audience. In order to do this, I will make sure that all four panels are different by using different shot types, different outfits, makeup and hairstyles and different poses. In the end, it will all tie in together with connotations of the music genre, a clear colour scheme and visual motif that is consistent throughout.

Initial ideas

I sketched rough flat plans for my initial ideas before showing it to the rest of my group. This was useful to me because I was able to produce a visual construction of what I wanted to achieve and it allowed my group members to contribute and tell me what works and what doesn't work.

Here are my initial flat plans with some reference points and notes:

At first, the group liked my idea of the front and back of the artist's face for the outside panels of the digipak. However, on second thoughts I decided that it would be boring to see the back of Georgina's head and it most likely would not appeal to the target audience who need to see more of the artist to identify with them and buy the album. We decided to develop the back panel on the right; having the focal image take up more space. We thought that the front panel on the left would obscure the artist's face and contradict our idea of direct address. In the end, I merged the two together and took the front panel from the left and the back panel from the right to form our final flat plan.

The group liked the idea for the inside panels but we faced problems with the props. Even after researching how to make a DIY throne, we were not convinced that we could pull it off. Gabriel and came up with the idea of the artist signing her name and I think that it would be a focal image for the inside panels. We kept the idea of GiGi signing her name for the final flat plan.


Final flat plans

I started brainstorming ideas for our album cover. At first, I toyed with the idea of purple paint and this led us to thinking of using purple glitter. I researched existing album covers and drew references from Selena Gomez and Rihanna.

I drew the flat plans for our digipak panels with reference points included below.

My drawing of the front cover
References for outside panels

Front panel:
I decided to have a medium close up (MCU) of our artist in the front cover. The shot type and pose was inspired by Selena Gomez's album Stars Dance. The idea of glitter was initiated when I remembered that Hyuna had glitter in her hair for her music video RED. Gabriel and I looked up photos of woman with glitter on their face and decided that it would be viable.

Back panel: 
I was mostly inspired by Rihanna's album for Good Girl Gone Bad. It features a focal image of the artist on the left. The tracklist, institutions, barcode and information are on the right. This was unconventional as most institutions run along the bottom and I thought that this would bring a twist to our album cover. However, in terms of shot type, the image on the back is a close up in order to create contrast with the long shot of her on the front cover. I used the same idea to have a long shot of GiGi on the back so as to differentiate with the MCU of her on the front.


For the inside, I wanted to show a different side to the artist and focused on having an image that showed a brighter, bubbly personality in contrast from the outside panels. I liked the pose that Carly Rae Jepsen used for Call Me Maybe and was to include that in our digipak. From my research into the feminist movement, I was inspired to include the colours of the suffragette movement in either our digipak or website. Because of this, I would like to put in a purple, white and green background of the inside panels.

These are the inside panels that I drew:
(note - I had originally planned to have the panel of GiGi signing her name in the right panel, but realised that it would be covered by the plastic casing for the CD. Hence, I swapped them around)

My drawing of the inside panels

References for inside panels

Front panel:
After scrapping the idea of the throne, Gabriel came up with the idea of GiGi signing her name. We were inspired by the font of Carly Rae Jepsen's Call Me Maybe album which looked handwritten and gave the album a personal touch.

Back panel:
I wanted to include the squatting pose that Carly Rae Jepsen has in her album covers.

Flat planning our digipak panels was extremely important to us so that we have a clear understanding of what shots we want to achieve and how we want the end product to look like. We could also make changes to our ideas as we discovered new themes or ideas.